


DIY Templating of Granite Worktops
These instructions explain the Templating process and other things you should know about solid stone worktops.
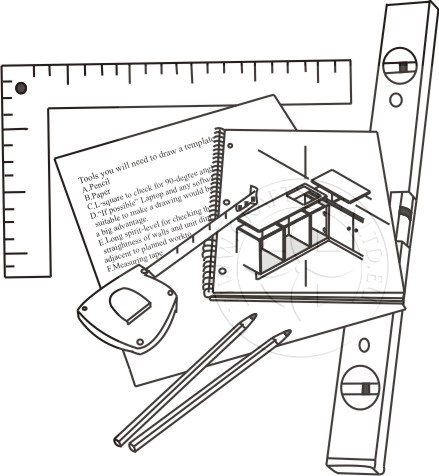
Tools you will need to draw a worktop template:
Our factory prefers your drawings supplied in CAD format. If this is not possible then send us your hand drawings. Our engineers will check them and send final drawings back to you for your confirmation. Please fax, email, or post us your drawings.
- Pencil and Paper
- Preferred Alternative : Computer CAD drawing
- Alternatively you can make wooden templates of your worktops and deliver them to our workshop. Our specialists will manufacture your worktops based on the wooden templates provided.
- Granite Quote Form
- L-square to check for 90-degree angles.
- Long spirit-level for checking the straightness of walls and unit dimensions adjacent to planned worktops
- Measuring tape
Before preparing the granite worktop template drawing:
- Check the cabinets: Ensure that base cabinets are secured firmly to the wall, are level and securely braced. Also make sure that the floor can support the weight of granite worktops.
- Cutouts: Decide what type of sink you’ll have (under-mounted or over-mounted) and the final locations of cut-outs needed (for sink, hob, drainer grooves, tap or any other type of cut-out) and in which cabinets it will go. You can check the whole list of cut-outs on our website’s “Granite Quote”.
- Appliances: don’t forget to make sure that you have included all the appliances you’ll need.
- Worktop Layout: Where are you having worktops, is the weight evenly distributed, are there adequate supports (especially over appliances, into corners, next to walls and overhangs).
- Possible Sizes: Standard material sizes are in the ranges (special sizes are available on request):
- Slabs 3m-3.15m x 1.6m to 2.2m,
- One side Pre-polished blanks 2.6m-2.9m x 0.6m-0.65m
- Worktop Thickness -30mm and Upstand thickness - 20mm
- An average 3m stone worktops needs at least 3 people to lift safely
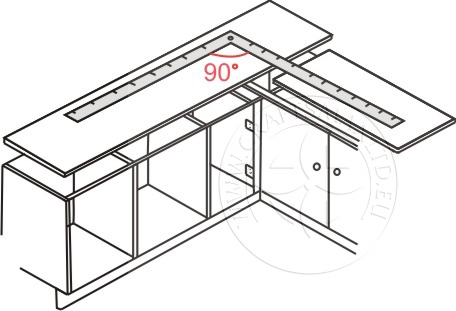
- Joints Placement: To begin with, try to make joints unobtrusive. It is important to get joint location right. 90 degree angle joints are the easiest to work with. So, while planning worktop layouts, choose the location of these angles prior to any other.
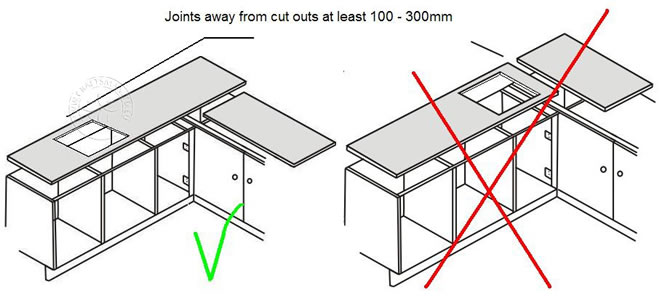
- Don’t make a joint across a sink, hob or any other type of cut-out. Every joint must be at least 100mm (preferably 300mm) from a cutout.
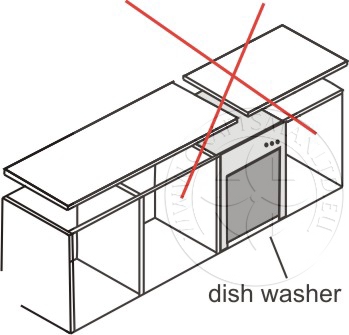
- Don’t make a joint over a dishwasher or washing machine (as the vibration may cause damage). Every joint must be at least 100mm (preferably 300mm) from the side of these appliances.
- Choose the location of joints carefully to make fitting easier. Granite worktops can be large and are heavy, can you get them into the room and then into position safely without damaging them or your walls, kitchen units etc.
Measuring and making the granite worktop template drawing
(medium-size kitchen template can be done in 1- 3 hours):
Layouts, Joints, Overhang, space and movement, wooden supports, sizes and weight
Layout of any joints should be decided after accurately measuring the walls next to the worktop.
- Start measuring from the best corner where the walls are straightest. If you start with the truest reference point, it will be simpler to measure and link worktop pieces to each other.
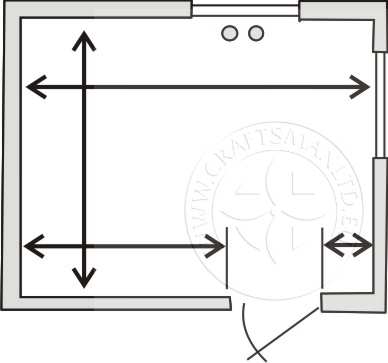
- 90 degree angle joints are the easiest to work with. So, while planning granite worktop layouts, choose the location of these angles prior to any other.
- Place joints as far as possible from cut-outs (especially, from sink and hob cut-outs).
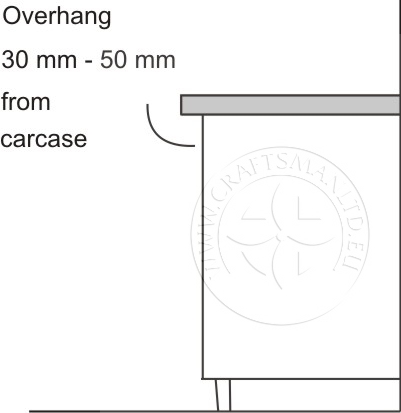
- Your granite worktops will look better if they overhang the base units and doors. We recommend the overhang to be between 30/40 mm from base unit carcase, (not from the door front). For example, if your base unit is 575 mm deep, the recommended worktop depth would be 605/625 mm (575 mm + 30/50 mm = 605/625 mm).
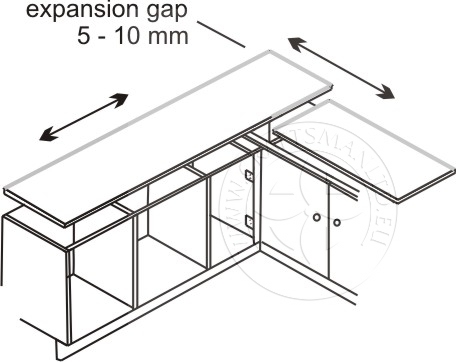
- Allow for natural movement. Allow a 5 – 10 mm expansion gap between the granite worktop rear edges/ends and the wall surfaces. This needs to be done to allow for the natural movements (contractions/expansions) of the granite worktop.
- This gap also makes it much easier to fit the heavy granite worktops and move them together to make good joints.
- This will also help if the walls are not perfectly straight.
- When you come to seal this gap use a low modules silicone sealer, or cover it using tiles (10 mm thickness + tiling cement) or granite upstands (20 mm or 30 mm thickness + silicone). In most situations, upstands and back-splashes are strongly recommended.
- While choosing the dimensions of granite pieces, remember that granite worktops are very heavy (80-90 kilograms per square meter) and the weight needs to be distributed evenly on the base units.
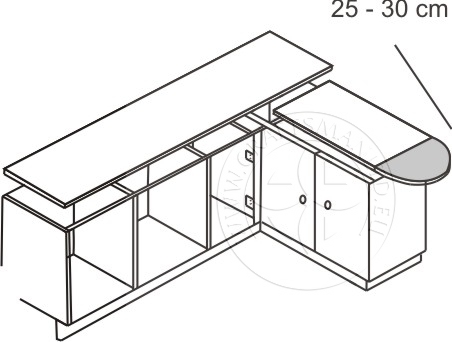
- Unsupported granite worktop overhang can be up to 25-30 cm (for a breakfast bar or island piece overhang for example).
- Normal maximum size of granite slabs is 3x2 metres, so maximum length for a worktop piece is 3 meters. If you would like to have a longer piece, please enquire about the material and length availability.
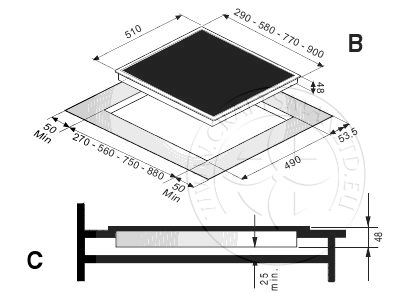
- You will need to ensure that suitable space and support is provided for sinks and hobs. In most cases sinks and hobs will come with fitting instructions that explain how to adapt the base unit to provide adequate room and support. Copy sink, hob cut-out dimensions from installation instructions book and enter them on your worktop drawing including model name and supplier’s contact details. This will allow us to contact your supplier directly if we have any queries.
Quick summary for measuring and making the drawing:
Consider the layout of worktop joints.
- Place joints as far as possible from cut-outs and appliances
- Calculate overhang to be 30/50 mm from the base unit carcase.
- Allow a 5/10 mm expansion gap at each wall.
- Make sure that suitable space and support is provided for sinks and hobs.
- Copy sink, hob cut-out dimensions from the installation book including model name and supplier’s contact details.
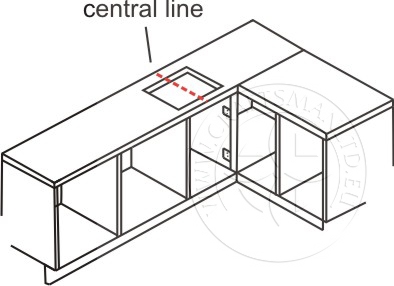
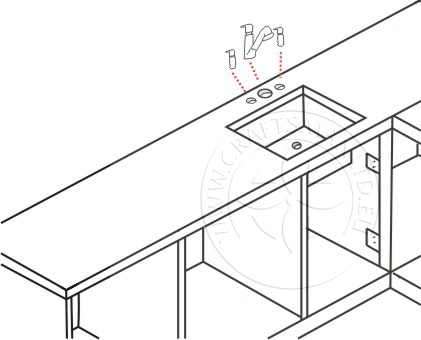
Mark centres for hobs, sinks and other cut-outs
While measuring a hob, sink, tap and switch cut-outs, we need you to mark centre lines of each cut-out separately.
We need:
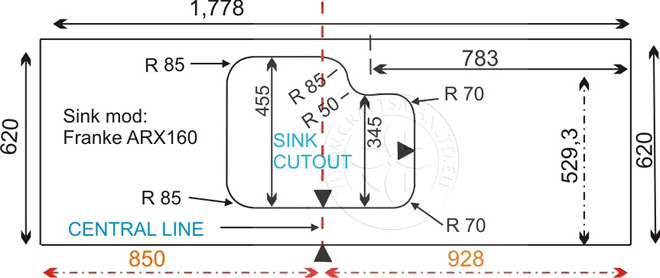
- dimensions from the left end (in length) to the centre of cut-out and from the right end to the same central line
- dimension from the front edge to the actual cut-out and from back edge of the worktop to the actual cut-out (or central line).
You can simply get actual cut-out dimensions from the installation instructions book or retailer’s website and enter them on your worktop drawing.
For under-mounted sinks the cut-out dimensions should be 10-20 mm less than sink or bowl inside dimensions.
Quick summary for hobs, sinks and other cut-outs:
- Mark centre lines of each cut-out separately and record figure (distance) details in mm
- Get actual cut-out dimensions by measuring actual sink or hob or from instructions book or retailer’s website.
Granite Worktop Joints - Bridges
Do not place joints on a hob or a sink cut-out, the granite in these places is significantly weakened.
If you must have joints at cutouts we advise customers to use bridges. (Instead of a cut out, the worktops go up to each side of the hob or sink, then narrow pieces – bridges – are used across the front and back of the hob or sink.) Bridge joints will be only 20-25% visible because a hob or other mounted sink overhang or trim will hide most of the joint .

Quick summary for joints:
- Avoid placing joints on (or very near) a hob or sink cut-out.
- Use bridges only if absolutely necessary.
Drainer grooves, recessed area, taps, plumbing pipes
Drainer grooves and the recessed area around the sink should be shown on the drawing .
- On the drawing, please mark which side of the sink has the drainer grooves.
- Also, if necessary mark any recessed area around sink.
- Indicate on the drawing where taps are located and provide a hole diameter (usually it is 22-35mm). Contact your plumber or check the installation instructions of your tap if you are unsure about the hole diameter.
Quick summary for drainer grooves, recessed area and tap:
- Drainer grooves – which side.
- Recessed area around sink.
- Holes for taps and other holes and cutouts for plumbing pipes.
Additional Points:
After measuring
After making granite worktop template, make sure cabinets and supports are not moved!
Pick-up, carrying and storing the worktops
It’s advisable to always carry and store granite worktops upright in order to avoid damage (with polished edge at the top and rear edges at the bottom). Protect the granite worktops with thick polystyrene or wood (or similar protective material) on the bottom of A-frame or wooden box (it will help avoid breaking and chipping the bottom worktop edges).
An average 3m stone worktops needs at least 3 people to lift safely so make sure you have the manpower available.
Installation of granite worktops
Install your worktops as soon as possible after you receive them and never store them where any trades or construction works are being performed!
Other related pages:
- How to choose the most suitable granite worktop for your kitchen or bathroom
- DIY Templating of Granite Worktops
- DIY Fitting of Granite Worktops
- DIY Goods Delivery Options